
How to scan film negatives with VueScan
PhotoNetCast – Photography podcast
English - January 29, 2012 20:35 - ★★★★★ - 31 ratingsVisual Arts Arts Technology Homepage Download Apple Podcasts Google Podcasts Overcast Castro Pocket Casts RSS feed
This guide gives you the best settings and shows you how to scan black and white film negatives using the popular software VueScan.
If you’ve been listening to PhotoNetCast for some time, you might be aware that although the majority of my work is done in digital medium, I never left film completely. I’m not using it for stock or images that I know I might license, but the truth is I really like to photograph with a rangefinder or some middle format cameras, and I enjoy developing film.
That said, I’m not making prints since the little amount of work can’t justify having a dark room (although I’d love one). As such, and probably the case with the majority of photographers still using B&W film, after developing the negatives the transition to digital happens.
Below, I’ll try to explain my process scanning my Black and White negatives (next to “how do I develop film”, “how do I scan film negatives” has to be the mostly asked question I get when talking developing film at home).
The equipment
I’m not going to focus on equipment too much. I’ll just say that since I can’t justify the price of a good drum scanner (the best to scan negatives), I make do with a good flatbed scanner (probably the worst to scan negatives). I’m using a Canon CanoScan 8800F. If you go into photography forums discussing scanners, you’ll find that it’s worse than the Canon Nikon thing, so I’m just using something that gets the job done to a standard that meets my needs.
The Software
This is the major focus of this post. Forget the software bundled with your scanner – it is probably very good for paper documents, but it lacks the refinement that a dedicated software gives you. I’ve been using VueScan (Hamrick Software) for some time and I’ve been very happy with it.
Now, I’ve also heard that the learning curve for VueScan is steep. It’s true and things can go horribly wrong, but with a few tweaks (or maybe I should say getting rid of tweaks) the results are good.
Getting started
Have this in your mind: you will not get a perfect image out of the scanner. What you want is to grab as much information as possible from the negative, and work on it afterwards. This means, no clipping shadows or highlights, and minimal processing while digitizing the image. This will give you the best options for processing in some other software (Lightroom, Photoshop, Aperture, etc).
Settings
I usually have my settings as “bland” as possible. No curves, no white balance, nothing.
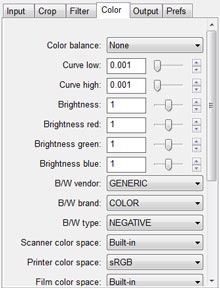
VueScan has a library of profiles for some common films, but not too extensive. I also don’t want to be thinking too much about contrast intensity when developing. So, I always go with a Generic profile (Color is the only option for brand – don’t worry about this, it won’t affect your result). I prefer to go as generic as possible because if you choose a profile, all you’re telling the software is to apply a set of adjustments that I prefer to apply on my own later on.
Scanning
Usually I do a full frame preview of one of the frames. The result will be far from optimal, and normally overexposed. If you notice the image below, you’ll see that, although I have included the margins between frames, which should be the blackest you have on the negative, on the left the histogram falls off quite before the axis. Pure black should be right there on the left.
What you have to do is tell the software what black is and adapt for that.
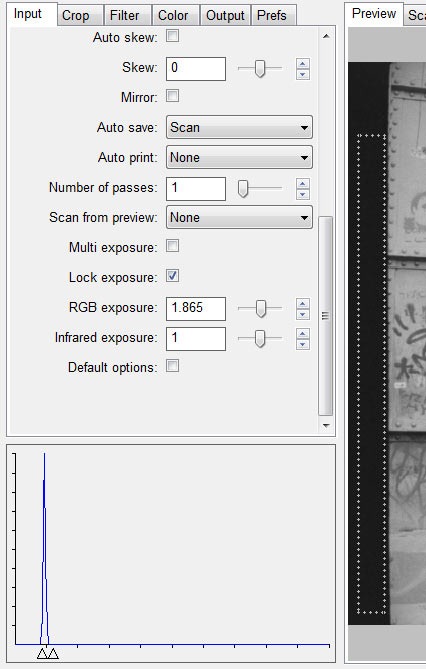
Select a rectangle on the transparent margins (pure black on the positive).
Notice that, as before, the density of black is not at the absolute left of the histogram. Now, check the box “Lock exposure”.
See that value on RGB exposure? This value is unique for each film and is calculated based on the pure black you’ve just selected.
Do not change the selection, and do another Preview.
If you look now at the histogram, you’ll see that the black is shifted to the left, right on the axis where it should be.
Now the software knows what black is and will adjust the exposure accordingly.
Selecting the entire frame and doing again a full preview should show you the final image, with the exposure adjusted.
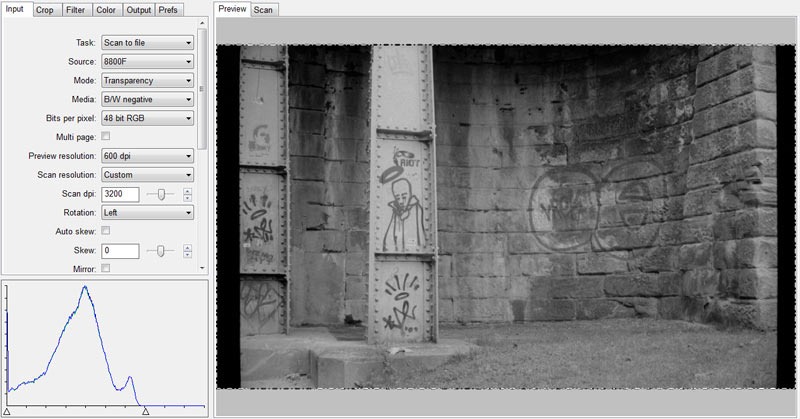
The blacks on the histogram fall off where they should and the image doesn’t look overexposed. Scan it to file (I do tif, but other non-destructive formats should work too).
As I’ve mentioned, this is a “flat” image but contains the maximum of data that can be gathered from the negative.
Post processing
I won’t dwell much on post processing as that is not the aim of this article, and it will depend on your vision for that specific image.
I use mostly Lightroom and tend to simply adjust the curves to increase contrast, maybe some dodging and burning if required, and spot removal if some dust grains escaped my cleaning.
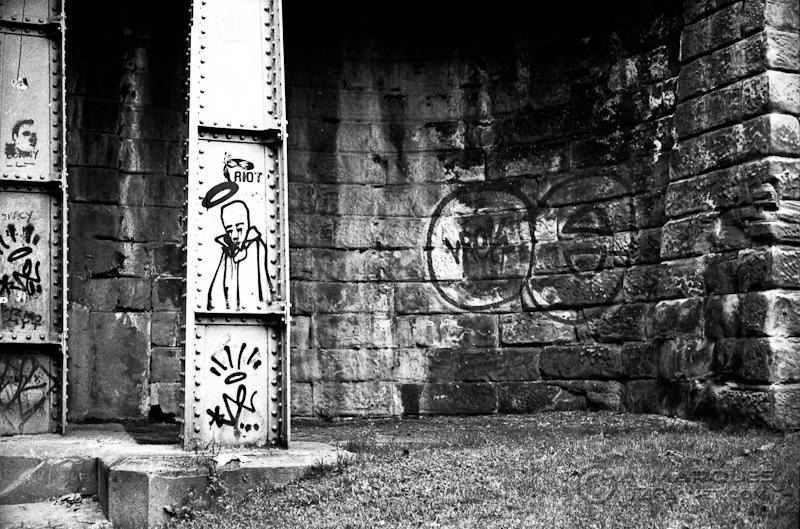
Final considerations
This seems like a complex process, but really isn’t. After you get used to it, it takes just a few extra seconds per roll.
I usually do this once per roll and not, as I was already asked, for every frame. Actually, after I have the exposure locked, I set VueScan to batch scan all the frames. Some photographers, probably much more perfectionists than myself, emphasize the need to repeat this process for every strip. I don’t believe that differences in the developing process are going to be so noticeable as to require exposure locking on a per strip basis, but your mileage may vary and you should experiment.
You should also have in mind that scanners have problems with very dense highlights (the very opaque blacks on the frames). You will get a better result by slightly under-developing the negative if your aim is just to digitize the film. Accordingly, pushing the film increases contrast and will require you to pay some more attention if you have very dense highlights but the principle is the same.
I hope that if you use VueScan and aren’t getting what you expect, this guide will improve you results when you scan your film.
As always, if you have any comments or questions, please post them below.
____________________________________
This article was brought to you by Nations Photo Lab, a professional photo printing and photo hosting partner.